
Introduction
So my 2 year old LG front loading washing machine was randomly leaking from the front left of the machine (see crude orange paint). It had started about 6 months ago, but it was random. And randomness is your worst enemy in problem solving! There would be times when it wouldn’t leak and times when it did. I tried to clean the drain (the small compartment closest to leak,) but it still leaked. Then one day, I had had enough! I was going to try to fix this damn thing!
Youtube is your friend
Of course I am frugal and didn’t want to pay someone $200-$300 to come out and fix the problem. That’s where Youtube come into play. I watched this video a couple of times and thought this would solve my problem. And so I went and bought this on Amazon for $12:

After a couple of days, it came in and I went to replace mine. So I opened up the back panel with a screwdriver (easy):

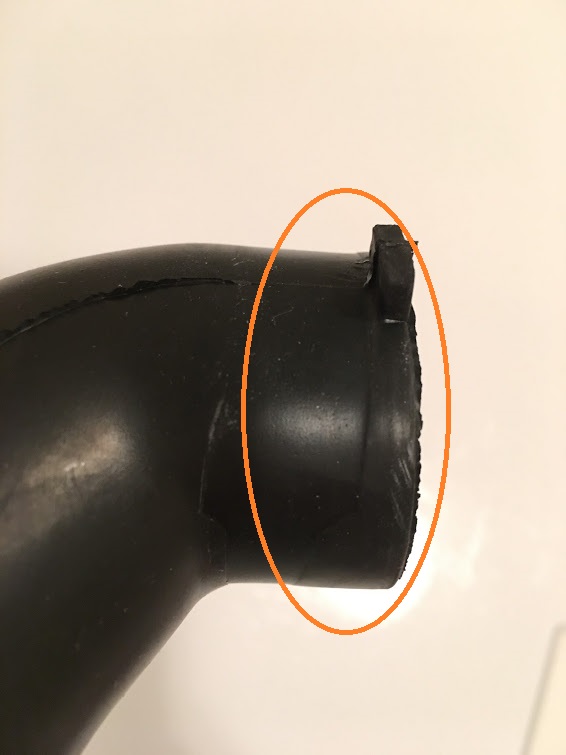
Then saw the part I needed to replace (ignore the orange circle for now.)

[Update – A reader informed me that you should not tip the washer over unless you’ve put the shipping bolts in to secure the drum, else it could ruin the suspension system of the tub.]
I had read on the Youtube comments that it’s easier to just tip the washer over. And so I had a buddy come over and he held it while I got underneath the washing machine. I was able to remove the 3 clamps and take off the part after 10 minutes. It probably would have taken a plumber a minute, but since I’m no plumber and I have soft hands, it took me 10 minutes! Anyway, when I removed the part and ran it under my sink, there were no leaks in it. FAIL! I decided to put in the new part since I wasn’t going to return the $12 part. The toughest part was putting the clamps back on, which I could not do. Another 15 minutes pass and it wasn’t happening.
My buddy had to go, so I just told him to go. Angry that I couldn’t put the new part on, I tilted the washer against the dryer and risked my life under the washer. It took me about 2 minutes to put it on. Here’s the tip on putting the rubber tube and clamps back on – DON’T TRY TO PUT THE CLAMP ON AT THE SAME TIME YOU PUT THE RUBBER TUBE ON! That was my mistake. You should slide the rubber tube on FIRST and then put the clamp on!
I’ve run the washer 5 times since my ‘fix’ and it hasn’t leaked once. Here’s a picture of the old rubber hose. If you look closely at the very top, where the clamp used to be, you can see it’s at a diagonal direction and very near the end of the hose. That meant the washing machine vibrations was letting a very small amount of water out of that gap between the end of the hose and the washing machine. I made sure to put the new clamp further in on the rubber hose. Could I have fixed this without buying the new hose? You bet! And that’s what I should have done before buying the new part.
I don’t know what I would have done without the internet. Most likely be $200-$300 poorer now!